
Business email hosting is the practice of linking your email address to a custom domain so that messages send from [email protected] instead of a generic free account. When you set up business email hosting correctly, you gain credibility with clients, control over your data, and a communication system that scales with your business. The process covers three core steps: registering or connecting a domain, configuring DNS records (MX, SPF, DKIM, and DMARC), and creating mailboxes. This guide walks small business owners and freelancers through each step, including how to choose between free and paid options without getting lost in technical jargon.
What do you need before setting up business email hosting?
The first requirement is a domain name. Domain registration costs $10–$15 per year from registrars like Namecheap or Google Domains. That annual fee is the minimum cost of a professional email identity, and it is worth every dollar compared to the credibility loss of a Gmail or Yahoo address on a business card.
Beyond the domain, you need access to your registrar’s DNS management dashboard. This is the control panel where you add and edit DNS records. If your domain is registered through one provider and hosted through another, you will need login credentials for both accounts before you start.
The third requirement is a decision: free email routing or a paid business email suite.
- Free routing (example: Cloudflare Email Routing combined with Gmail’s “Send As” feature) costs nothing beyond the domain fee. Cloudflare Email Routing plus Gmail delivers a professional email experience at zero additional cost, but it lacks some advanced features like shared calendars, team admin controls, and dedicated support SLAs.
- Paid suites offer full IMAP/POP3 support, integrated productivity tools, and service guarantees. Paid dedicated business suites typically range from about $0.49 to $7 per user per month, depending on the provider and feature tier.
Pro Tip: If you are a solo freelancer just starting out, the free routing method works well. If you manage a team of three or more people, a paid suite saves time and avoids workarounds.
| Requirement | What you need |
|---|---|
| Domain name | Registered domain, $10–$15/year |
| DNS access | Login to your registrar’s DNS dashboard |
| Hosting method | Free routing or paid email suite |
| Email client setup | IMAP/POP3 and SMTP credentials from your host |
How do you configure DNS records step by step?
The full setup process, from domain verification to a working mailbox, typically takes 30–60 minutes. DNS propagation adds some waiting time, but the hands-on work is straightforward if you follow the steps in order.
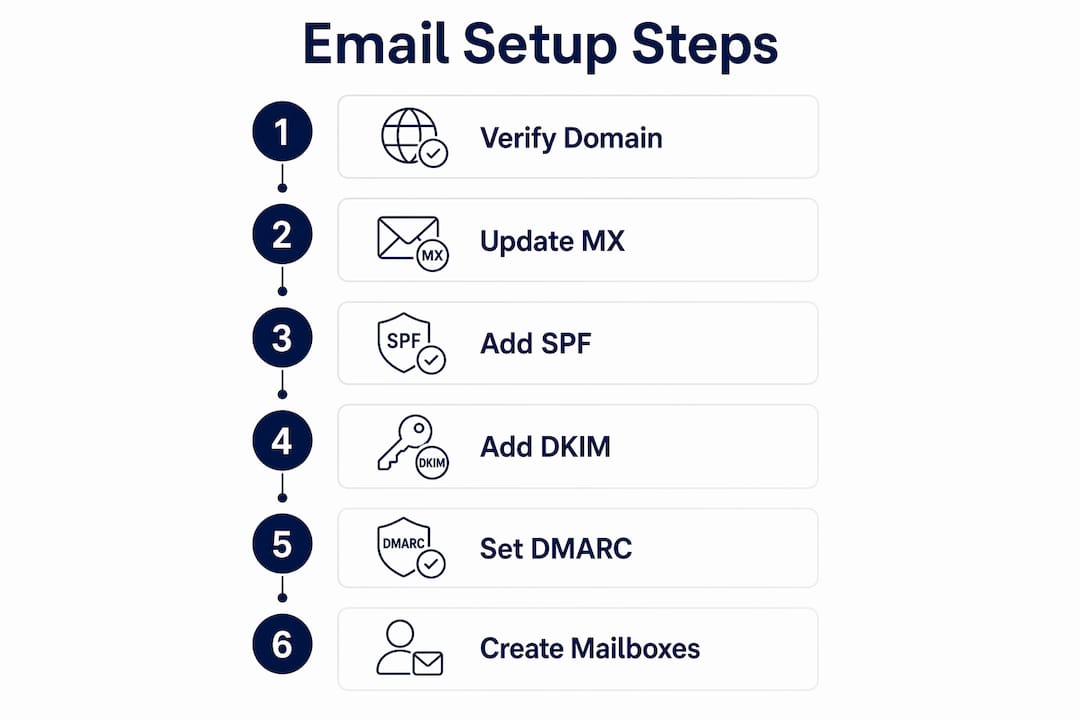
Step 1: Verify domain ownership
Your email host will give you a TXT record to add to your DNS settings. This record proves you own the domain. Log into your registrar’s DNS dashboard, create a new TXT record, paste in the value your host provides, and save. TXT record verification usually propagates within 5–30 minutes. Once your host confirms ownership, you move to the next step.
Step 2: Update your MX records
MX (Mail Exchanger) records tell the internet where to deliver email for your domain. Delete any existing MX records first, then add the ones your email host specifies. Each record has a priority number. Lower numbers mean higher priority. Your host will give you the exact values. Save the records and allow up to 24 hours for full propagation, though most changes take effect within an hour.

Step 3: Add an SPF record
An SPF (Sender Policy Framework) record lists the servers authorized to send email on behalf of your domain. SPF and DKIM records are critical to prevent spoofing and improve deliverability. Add a TXT record to your DNS with the SPF value your host provides. A typical SPF record looks like: v=spf1 include:mail.yourhost.com ~all. Only one SPF record is allowed per domain, so if one already exists, edit it rather than adding a second.
Step 4: Generate and add DKIM keys
DKIM (DomainKeys Identified Mail) adds a digital signature to outgoing emails. Your email host generates a public key for you. You add it as a TXT record in your DNS under a specific subdomain (usually something like mail._domainkey.yourdomain.com). This signature lets receiving servers verify that your emails are genuine and have not been altered in transit.
Step 5: Set up a DMARC policy
DMARC (Domain-based Message Authentication, Reporting, and Conformance) ties SPF and DKIM together and tells receiving servers what to do when an email fails authentication. DMARC should start in monitoring mode with p=none for about a month. This collects data on your email traffic without blocking any messages. After reviewing the reports, you can tighten the policy to p=quarantine or p=reject.
Pro Tip: Use a free DMARC report analyzer like dmarcian or MXToolbox to read your first month of DMARC reports. The data shows you exactly which servers are sending on your behalf, which makes tightening your policy much safer.
Step 6: Create mailboxes and configure your email client
Once DNS records are live, create your mailboxes through your hosting control panel. Then configure your email client (Outlook, Apple Mail, Thunderbird, or a mobile app) using the IMAP/POP3 and SMTP settings your host provides. IMAP keeps email synced across devices. SMTP handles outgoing mail. Use the exact server addresses, ports, and encryption settings your host specifies.
What are the real trade-offs between free and paid email hosting?
Free email routing setups work, but they come with real limitations. The Cloudflare plus Gmail method, for example, routes incoming mail to your Gmail inbox and lets you reply from your custom domain. It costs nothing beyond the domain. The trade-off is that you are still using Gmail’s infrastructure, which means Google’s data practices apply to your business communications.
Big tech suites come with hidden costs and privacy trade-offs. Specialized providers offer stronger security and encryption, which matters more as your business handles sensitive client data. For freelancers in legal, financial, or healthcare adjacent fields, privacy-focused hosting is not optional.
Paid suites solve the collaboration problem. They include shared calendars, admin consoles, group mailboxes, and support tickets. Free options often lack full feature sets and can complicate team collaboration as businesses grow. A team of five trying to share a single Gmail workaround will waste more time than the cost of a paid plan.
The practical decision comes down to two questions: How many people need email access? And how sensitive is the data you send? Solo freelancers can start free and upgrade later. Teams and businesses handling client data should start with a paid, privacy-focused provider from day one.
How do you troubleshoot common setup problems?
DNS propagation is the most common source of confusion. Changes to MX, SPF, DKIM, and DMARC records do not take effect instantly. Propagation can take anywhere from a few minutes to 48 hours, depending on your registrar and the TTL (time to live) values on your records. If email is not working an hour after setup, wait before assuming something is wrong.
The most common misconfigurations are:
- Duplicate SPF records. Only one SPF TXT record is allowed per domain. Having two causes authentication failures.
- Wrong DKIM subdomain. The subdomain prefix must match exactly what your host specifies. A single character difference breaks the signature.
- MX records pointing to an IP address. MX records must point to a hostname, not an IP address. Check your host’s documentation for the correct format.
- DMARC added before SPF and DKIM are verified. DMARC only works when the other two records are correctly in place. Set up SPF and DKIM first, confirm they pass, then add DMARC.
Pro Tip: Use MXToolbox’s free DNS lookup tool to check your MX, SPF, DKIM, and DMARC records after setup. It shows exactly what the internet sees and flags errors in plain language.
Consistency is the most underrated part of email setup. Your domain registrar settings and your hosting account settings must match exactly. A mismatch between the two is the root cause of most deliverability failures.
Email clients require correct IMAP/POP3 and SMTP settings to connect to your hosted mailbox. If your email client shows a connection error after DNS propagation is complete, double-check the server addresses and port numbers against your host’s documentation. Port 993 is standard for IMAP with SSL. Port 587 is standard for SMTP with STARTTLS.
Key takeaways
Professional email hosting requires a custom domain, correct DNS records, and a deliberate choice between free routing and a paid suite based on your team size and privacy needs.
| Point | Details |
|---|---|
| Domain first | Register a domain for $10–$15/year before any email setup begins. |
| DNS records matter | MX, SPF, DKIM, and DMARC records together protect deliverability and prevent spoofing. |
| Start DMARC in monitoring mode | Use p=none for the first month to collect data before enforcing strict policies. |
| Free vs. paid is a team question | Solo freelancers can use free routing; teams of three or more benefit from a paid suite. |
| Verify with tools | Use MXToolbox after setup to confirm every record is correctly configured. |
Why I think most small businesses overcomplicate this
The number of small business owners I have seen delay their professional email setup for months because they were afraid of DNS settings is striking. The fear is understandable. Terms like DKIM and DMARC sound intimidating. But the actual work is copying and pasting values from your host’s dashboard into your registrar’s DNS panel. That is genuinely most of it.
The mistake I see most often is skipping authentication records. Business owners get MX records working, email flows, and they stop there. Then six months later they wonder why their emails land in spam. SPF, DKIM, and DMARC are not optional extras. They are the foundation of a deliverable email address in 2026.
My other strong opinion: do not let the free option tempt you into a permanent workaround. Starting with Cloudflare Email Routing and Gmail is fine for a freelancer testing a new business idea. The moment you have paying clients, a team, or sensitive data moving through email, you need a dedicated provider with encryption and a real support line. The cost difference between free and a solid paid plan is often less than one hour of your billable rate per month.
Privacy is the consideration most guides skip. Big tech email platforms scan message content for advertising and product improvement purposes. For a freelancer sending client contracts or a small business handling financial data, that is a real risk. Privacy-focused hosting providers exist specifically for this use case, and they are not significantly more expensive than mainstream options.
— Davide
Dasabo’s approach to professional email hosting
Small businesses that want encrypted, privacy-first email hosting without a complicated setup process have a direct option in Dasabo. Dasabo provides domain integration, encrypted email, and 24/7 support, so you are not troubleshooting DNS records alone at midnight before a client presentation.
Dasabo manages over 5,000 websites and serves more than 20,000 customers, with a 99.9% uptime guarantee backing every plan. That reliability matters for email hosting because a provider that goes down takes your communication with it. If you are ready to move from a generic inbox to a professional address that reflects your brand, Dasabo’s business email plans are built for exactly that transition.
FAQ
How long does business email setup take?
Setting up professional email hosting typically takes 30–60 minutes for the hands-on work. DNS propagation can add up to 24 hours before everything is fully live.
Do I need a paid plan to get a professional email address?
No. Free options like Cloudflare Email Routing combined with Gmail’s “Send As” feature deliver a custom domain email address at no cost beyond domain registration. Paid plans add collaboration tools, admin controls, and stronger privacy protections.
What DNS records are required for business email?
MX records route incoming email, SPF and DKIM records authenticate outgoing mail, and DMARC ties them together for policy enforcement. All four record types are needed for a fully functional and secure business email setup.
Why is my email going to spam after setup?
Missing or misconfigured SPF, DKIM, or DMARC records are the most common cause. Use MXToolbox to check each record and confirm they pass validation before sending to clients.
How much does a domain name cost for business email?
Domain registration costs $10–$15 per year from registrars like Namecheap or Google Domains. That domain is the foundation of your branded email address.